
How To Sign Up For Payoneer + Get a $25 sign up bonus
If you are a blogger/freelancer from foreign countries, it can be difficult to get paid online because most of the companies do not pay directly to foreign bank accounts. Payoneer is a great alternative that allows you to receive payments from US and European companies instantly, without having a US bank account. Payoneer provides its users a virtual US-based checking account to receive payments on, and it also provides a Payoneer which can be used to withdraw the money at any ATM booths in the world.
Sign up with this link to receive free $25 bonus along with your Payoneer
What Is Payoneer?
Payoneer is a well-established financial services business based in New York. It provides online money transfer and e-commerce payment services. It is a registered Member Service Provider worldwide. Anyone who is 18 years or older can sign up for a Payoneer account and start receiving their payments online. Additionally, Payoneer also has all the functionality of Paypal where one Payoneer user can send money to another user without any fees.
In this Payoneer review, we will be focusing on how to sign up for a Payoneer account, Payoneer and also receive $25 Payoneer sign up bonus.
Signing Up For A Payoneer Account
1. Click here to goto Payoneer sign up page. (link opens the $25 bonus offer)

Click on the link or image to open sign up page of Payoneer. Click the “Sign Up & Earn $25” button. Select if you are US resident or not. Continue.
Note: This is a referral link which enables you to get the $25 sign up bonus when you receive $100 or more on your Payoneer account.
If you sign up on Payoneer’s website directly, you will not receive the $25 bonus. I did the same mistake back when I first started using Payoneer.
2. Fill in the information.
 Enter your first name, last name, email address and date of birth.
Remember: You have to be 18 years or older. Before you can use provided by Payoneer, they ask you to upload a verification (driving license, citizenship, or state ID) to prove your age and to verify you are a real person.
It is a simple process. You may use your cellphone to capture image of your ID and upload on Payoneer’s website. I believe they only want to see that you meet the minimum age requirement.
3. Fill in contact details.
 Here, you have to fill in your contact details like country and address.
Remember: Country cannot be changed later.
You can update your email address, phone number and address whenever you want. But country is permanent. Although it will work in any ATM booth that accepts, there will be extra fees if you transact in other country that where you are located. So select your home country and when asked to verify, upload a picture of your driving license or citizenship ID.
4. Fill in security details.
 Here you can set your password. Everything else is self-explanatory.
You can set security questions and answers. You can also change them later in case if you forget.
5. Upload verification ID and order
The last step is easy as well. Select which form of verification you want to upload. Fill in some details, upload the photo (or scanned PDF) of your ID. Agree to their terms and conditions. Then press ORDER to order your free Payoneer!

Done! It may take up to 2 weeks for your Payoneer to arrive in your mailbox. Please make sure you put the address correctly in Step #3 while signing up. Once the physical car is in your hands, it is time tod activate Payoneer and account!
Activating Payoneer And Account
After you order, when you login to your Payoneer account, on the main page it will show you the option: “view your status and activate your account”. Click on the activate button and the following will appear.
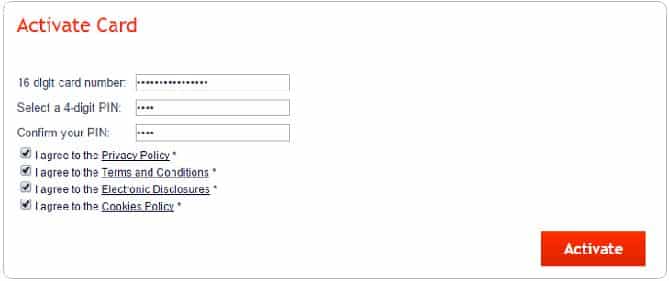
To successfully verify your Payoneer account, enter the 16 digit that’s printed on the you received in the mail. Select a 4-digit pin code and activate. Now you are all set! 🙂
Withdrawing Money From Payoneer
The Payoneer prepaid can be used to cash out available money from your Payoneer account. It works at almost all ATM booths. Available Payoneer balance can be checked by logging to your online account. Alternatively you can install Payoneer app on your mobile device and easily check available balance. Balance inquiry from ATM booth costs $1 fee so it is always best to check the balance online and withdraw cash using ATM machine.
Payoneer ATM withdrawal limit: I don’t think there is a limit set by Payoneer. However, the local ATMs around your home will have maximum limit per transaction. In that case, you will have to make multiple transactions if you want to withdraw more money.
Depending upon the country you are in, Payoneer also lets you transfer money from Payoneer to your local bank account directly. Please check Payoneer’s website for more information and associated Payoneer bank transfer fees.
Note that Payoneer bank account is not a real physical bank. However, they provide account number and routing number just like a normal bank account – which is the best thing about it. Many Payoneer partner companies like Amazon Associates, Commission Junction, Clickbank, etc, give payments to freelancers and bloggers using Payoneer via ACH bank transfers. Once you sign up and activate your, you’ll have your own routing number and bank account number provided by Payoneer. Simply provide those to the companies you want to receive payments from. The payment is almost instant.
Fees Associated With Payoneer
There are some Payoneer fees and that you should know.
$29.95 for Payoneer Annual Account Maintenance.
Charged on the date when you receive sufficient balance for the first time. ($29.95 charged every year on the same date from available balance.) If the available balance is $0, there is no charge.
$3.15 ATM withdrawal or cash disbursements (via bank teller or in-store). Per transaction. *surcharge may also be applied by your local ATM/POS service provider.
1% Payoneer load fee. For example, if you get paid $100, your account will receive $99.
ATM Decline Fee $1.00 per transaction.
ATM Balance Inquiry Fee $1.00 per transaction.
Note: Sending money from Payoneer to Payoneer account is free.
Sign up on Payoneer to receive free $25 bonus along with your
This Payoneer review should have helped you to sign up and receive your Payoneer, and bank account. At the very least, we hope it gave you some information about Payoneer, its benefits, associated fees and some money saving tips.